-->

    Social Items

How To Run Javascript On Google Chrome Snippet
How To Run Javascript On Google Chrome Snippet - in this post, we will learn how to run the JavaScript source code in the Google Chrome browser. Usually, if we want to create javascript, it must be embedded in HTML or web files to run, but now we will run javascript code on Google Chrome with Snippets without having to be embedded into the HTML file.

How To Run Javascript On Google Chrome Snippet


Step 1: Open Google Chrome


Picture of Google Chrome

Step 2: Open the Snippets tab


  1. Right-click on google chrome
  2. Select the Inspect
  3. Open the Sources tab
  4. Select the Snippets.

Picture of Snippets tab

Step 3: Create and run a new snippet


  1. New snippet
  2. Insert the name snippet
  3. Enter Javascript code
  4. To run the snippet by pressing CTRL + ENTER on the keyboard or can right-click on the file and select run.
  5. The results will be displayed on the console tab.
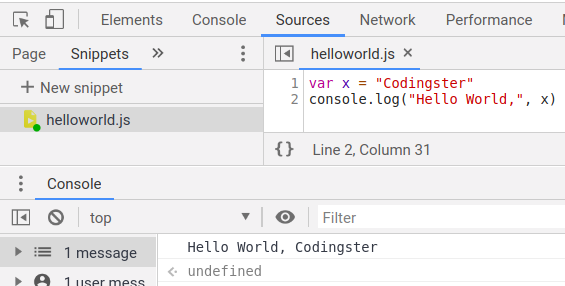
Picture of Hello World on the Chrome snippets


How To Run Javascript On Google Chrome Snippets

Go Program To Multiplication Two Matrices (Golang)

Go Program To Multiplication Two Matrices (Golang) - In this post, we will learn how to create a program calculate the two matrix multiplication in the Go programming language.

Matrix is a collection of numbers arranged in rows (vertical) and columns (horizontal) can also be called two-dimensional arrays. matrix multiplication has the condition that the number of columns of the first matrix is equal to the number of rows of the second matrix.

Go Program To Multiplication Two Matrices (Golang)

Source Code:


package main

import "fmt"

func main() {

  var matrixA [10][10]int
  var matrixB [10][10]int
  var result [10][10]int
  var i, j, k, m, n, p, q, total int

  total = 0

  fmt.Print("Enter the number of rows the first matrix: ")
  fmt.Scanln(&m)
  fmt.Print("Enter the number of columns the first matrix: ")
  fmt.Scanln(&n)

  fmt.Print("Enter the number of rows the second matrix: ")
  fmt.Scanln(&p)
  fmt.Print("Enter the number of columns the second matrix : ")
  fmt.Scanln(&q)

  if n != p {
    fmt.Println("Error: The matrix cannot be multiplied")
  } else {

    fmt.Println("Enter the first matrix elements: ")
    for i = 0; i < m; i++ {
      for j = 0; j < n; j++ {
        fmt.Scan(&matrixA[i][j])
      }
    }

    fmt.Println("Enter the second matrix elements: ")
    for i = 0; i < p; i++ {
      for j = 0; j < q; j++ {
        fmt.Scan(&matrixB[i][j])
      }
    }

    for i = 0; i < m; i++ {
      for j = 0; j < q; j++ {
        for k = 0; k < p; k++ {
          total = total + matrixA[i][k]*matrixB[k][j]
        }
        result[i][j] = total
        total = 0
      }
    }

    fmt.Println("Results of matrix multiplication: ")
    for i = 0; i < m; i++ {
      for j = 0; j < n; j++ {
        fmt.Print(result[i][j], "\t")
      }
      fmt.Print("n")
    }
  }
}

Save the source code with the name of multiplymatrices.go, but adjust wrote with a file name that chills and don't forget the extension should .go

Compile & Run :

Here's how to compile source code manually:

$ go build multiplymatrices.go
$ ./multiplymatrices
You can run without having to compile it:

$ go run multiplymatrices.go

The Output of Program :

Picture of result the program

Conclusion:


From the results of the matrix multiplication program, it can be successfully run without any errors and display the results of the first matrix multiplication and the second matrix with a 3 x 3 order.

Go Program To Multiplication Two Matrices (Golang)

How To Install Sails.js With NPM

How To Install Sails.js With NPM - In this post, we will learn how to install Sails.js with npm. Sails.js is one of the MVC web frameworks built with Node.js, express.js, and Socket.io. To find out more about Sails.js, you can open the Sails.js website.

Before installing Sails.js on your computer you must first install Node.js and npm.

How To Install Node.js On Ubuntu 18.04

How To Install Sails.js With NPM


Step 1: Install Sails.js

Open the terminal and type the following command line:
$ npm install sails -g
Note: if you use Ubuntu, you can include sudo.

Step 2: Create a project

$ sails new test
Picture of creating Sails.js project

In the command line, we will create a project with the name test. Next, we will be asked for the template selection in the form of a web app or empty. When finished, Sails.js creates the project folder test and generate the files.
Picture of Sails.js project on the web browser
Picture of the folder structure Sails.js project

Step 3: Run the project

$ cd test
$ sails lift
To see the results of the Sails.js project, we can open a browser and type 127.0.0.1:1337 in the browser address bar.

Picture of Sails.js project on the web browser
Picture of Sails.js project on the web browser

Conclusion:


Sails.js is one of the MVC web frameworks built with Node.js, express.js, and Socket.io. For Sails.js installation, we can use NPM (Node Package Manager). After the installation is complete we can create a project with Sails.js. To run the project we can type sails lift and we can see through the browser by typing 127.0.0.1:1337.

How To Install Sails.js With NPM

How To Install Go Language On Ubuntu 18.04

How To Install Go Language On Ubuntu 18.04 - In this post, we will learn how to install Go Language on Ubuntu 18.04. Golang is a programming language developed by Google and released in March 2012 with version 1.0. If you want to find out more, you can open the Go Language website. In this tutorial, the latest version of Go is 1.11.5. I will use the latest version in this tutorial.

How To Install Go Language On Ubuntu 18.04

Step 1: Download and Install Go

Open the terminal and follow the steps of each line.

For Ubuntu 32 Bit:

$ wget https://redirector.gvt1.com/edgedl/go/go1.11.5.linux-386.tar.gz
$ sudo tar -zxvf go1.11.5.linux-386.tar.gz -C /usr/local

For Ubuntu 64 Bit:

$ wget https://redirector.gvt1.com/edgedl/go/go1.11.5.linux-amd64.tar.gz
$ sudo tar -zxvf go1.11.5.linux-amd64.tar.gz -C /usr/local

Step 2: Setup Go Environment Variable


$ echo 'export GOROOT=/usr/local/go' | sudo tee -a /etc/profile
$ echo 'export PATH=$PATH:/usr/local/go/bin' | sudo tee -a /etc/profile
$ source /etc/profile


Step 3: Testing

after the installation is complete, you can see the version and environment of the Go programming language

$ go version
$ go env

Picture of Go environment variable

How To Install Go Language On Ubuntu 18.04

How To Install Visual Studio Code On Ubuntu 18.04

How To Install Visual Studio Code On Ubuntu 18.04 - In this post we will learn how to how to install Visual Studio Code text editor in Ubuntu. Visual Studio Code or VSCode is a free text editor that was developed by Microsoft Corporation. To find out further VSCode you can open Visual Studio Code website.

How To Install Visual Studio Code On Ubuntu 18.04


Step 1: Download Visual Studio Code from Web

For Ubuntu 32 Bit:
For Ubuntu 64 Bit:

Step 2: Install Visual Studio Code

After the download is complete we will directly install the VSCode download results, open a terminal and open the Directory Downloads. Adjust the downloaded VSCode file name when installing with dpkg.

$ cd ~/Downloads
$ sudo dpkg -i code_1.30.2-1546901646_amd64.deb
After installation is complete then the VSCode already exists in ubuntu. Open visual studio code from the Ubuntu menu.

Picture of Visual Studio Code

How To Install Visual Studio Code On Ubuntu 18.04

How To Install Node.js On Ubuntu 18.04

How To Install Node.Js On Ubuntu 18.04 - In this post, we will learn how to install Node.js on Ubuntu 18.04. Node.js is a javascript runtime environment built on the Chrome V8 JavaScript engine to execute javascript code that is open source and can run on cross-platform (all platforms). The advantages of Node.js are Highly scalable, data-intensive, and real-time apps. To find out more, go to the website Node.js.

In this tutorial, the latest version of Node.js is 11.6.0 and for the LTS (Long Term Support) version is 10.15.0, I will use the latest version in this tutorial.

How To Install Node.js On Ubuntu 18.04


Via PPA (Package Personal Archive)

Open the terminal and follow the steps of each line

Step 1: Install Dependencies

$ sudo apt-get install curl python-software-properties


Step 2: Adding PPA

For Latest Version:
$ curl -sL https://deb.nodesource.com/setup_11.x | sudo -E bash -
For LTS Version:
$ curl -sL https://deb.nodesource.com/setup_10.x | sudo -E bash -


Step 3: Install Node.js

$ sudo apt-get install nodejs


Step 4: Testing

$ node -v
$ npm -v
Picture of Node.js Version

Step 5: Hello World (Optional)

After the installation is complete, we can try to create a hello world with Node .js. Create a file with the name of helloworld.js.
$ nano helloworld.js

Insert the code below into the file.
const http = require('http');

const hostname = '127.0.0.1';
const port = 3000;

const server = http.createServer((req, res) => {
  res.statusCode = 200;
  res.setHeader('Content-Type', 'text/plain');
  res.end('Hello World from Codingster\n');
});

server.listen(port, hostname, () => {
  console.log(`Server running at http://${hostname}:${port}/`);
});

To run the file we can do the following command line:
$ node helloworld.js

After the file helloworld.js running so we can view it by opening a browser and type 127.0.0.1:3000 in the address bar of the browser.

Picture Hello World with Node.js

Conclusion:


Node.JS is a javascript runtime environment built on Chrome's V8 JavaScript engine to execute javascript code that is open source and can run on cross-platform (all platforms). There are several steps to install Node.js on Ubuntu, including adding PPA Node.js to Ubuntu, we can install Node.js with the latest version or the LTS version. The second step is to install Node.js with apt-get install. After the installation is complete we can see the version of Node.js installed on Ubuntu.

How To Install Node.js On Ubuntu 18.04

How To Install Atom Text Editor On Ubuntu 18.04

How To Install Atom Text Editor On Ubuntu 18.04 - In this post, we will learn how to install the Atom text editor on Ubuntu. Atom is a free or open source text editor developed by Github. To find out more about Atom, you can open the Atom website. One of the advantages of this text editor is the availability of plugins that can help work easier.

Features provided by Atom:
  • Smart Autocompletion
  • Multiple Panes
  • File System Browser
  • Built-in Package Manager
  • Find and Replace
  • Cross-Platform Editing

How To Install Atom Text Editor On Ubuntu 18.04


Via PPA (Personal Package Archive)


Open the terminal and follow the command every step.

Step 1: Adding PPA

$ sudo add-apt-repository ppa:webupd8team/atom

Step 2: Update and Install Atom

$ sudo apt-get update
$ sudo apt-get install atom

After installation is complete then the Atom already in Ubuntu. Just open the Atom from search Ubuntu.

Picture of Atom
Picture of Atom

Optional:  Uninstall Atom


To uninstall Atom, you can use the following command line:
sudo apt-get remove --purge atom

How To Install Atom Text Editor On Ubuntu 18.04


How To Install Postman On Ubuntu 18.04 - In this post, we will learn how to install Postman on Ubuntu 18.04. Postman is a GUI (Graphics User Interface) tool that functions as a Caller API (Application Programming Interface) but not only that there are other features such as Testing API, Sharing Collection for Documentation whose features are free, but there are also paid features such as Real-time Collaboration features Team, API Monitoring, and Integration. To find out more about the postman, you can open the Postman website.

Step 1: Download and Install Postman

Open a terminal and follow the steps of each row:

For Ubuntu 32 Bit:

$ wget https://dl.pstmn.io/download/latest/linux32 -O postman.tar.gz
$ sudo tar -xzf postman.tar.gz -C /opt
$ rm postman.tar.gz
$ sudo ln -s /opt/Postman/Postman /usr/bin/postman
For Ubuntu 64 Bit:
$ wget https://dl.pstmn.io/download/latest/linux64 -O postman.tar.gz
$ sudo tar -xzf postman.tar.gz -C /opt
$ rm postman.tar.gz
$ sudo ln -s /opt/Postman/Postman /usr/bin/postman

Step 2: Adding icon laucher Postman

After downloading and installing is complete, the Postman launcher icon is not yet on Ubuntu so we must configure it by adding the launcher icon file, open the terminal and type the following command.


$ nano ~/.local/share/applications/postman.desktop
Enter the configuration below into the file.
[Desktop Entry]
Encoding=UTF-8
Name=Postman
Exec=postman
Icon=/opt/Postman/resources/app/assets/icon.png
Terminal=false
Type=Application
Categories=Development;
After the installation is complete, Postman is already on our Ubuntu. Just open postman on Ubuntu search, then create an account or login if you already have it.

Picture of the Postman

Conclusion:

Postman is an application tool for Caller API that is free but has paid features. Postman also supports the Ubuntu operating system and his family. From the beginning of the installation process Postman we have to download the Postman installer file with type compress tar.gz after downloading we have to extract it and move it to the opt directory in the root and also link to the /usr/bin directory. After the installation is complete Postman can only be opened through the terminal, to open with the launcher icon we have to create a configuration file to display on the Ubuntu menu. We must log in first to use this postman tool.

How To Install Postman On Ubuntu 18.04

Subscribe Our Newsletter